 GlideMix
 Manual
For GlideMix Beta on macOS and Windows. Quick answers are in the FAQ; for anything else, ask in Discord or write to [email protected].
GlideMix is a DJ mixing studio. Instead of mixing live on two decks, you arrange your songs on a timeline and decide exactly when the next song comes in, how long the blend lasts and which effects ride on it. Then you play the mix, perform it with a headphone cue, broadcast it, or export the finished file.
What do you want to do?
- Make my first mix
- Add my music
- Use my other DJ app's library
- Find the next song
- Change the order of the songs
- Change where two songs meet
- Choose or build a transition
- Mix a transition on the DJ mixer
- Keep songs on the beat all the way through
- See the beat grid through the songs
- Change the tempo
- Keep the pitch when the tempo changes
- Make two songs fit in key
- Loop or repeat a section
- Fix a song that is off the beat
- Add an effect or plug-in
- Draw or record automation
- Add my samples and sound effects
- Put a loop or an FX under a song
- Save part of a song as a sample
- Make a drum loop from my own samples
- Find similar sounds, resample or make variations
- Split a song into stems
- Take the vocals or drums out of part of a song
- Play live with a headphone cue
- Go on air
- Read the DJ clock: time left, bars, next mix
- Reanalyze a song with GlideMix's own grid
- Make GlideMix bigger or smaller
- See the Getting started setup again
- Export the finished mix
- Export each track separately
Your first mix, step by step
This takes about ten minutes. Each step links to more detail further down.
- Start a project. On Home → Project, click New (or press ⌘/Ctrl + N).
- Show the library. If you don't see it under the timeline, click Music library at the top right of the window.
- Add your music. Click + next to Music Collection and choose a folder. More ways.
- Analyse it. Above the list, click New, then Select All, then Analyze. Rekordbox and Lexicon users can skip this: see how.
- Add the first song. Double-click it. It lands on the timeline.
- Add the next song. Double-click it. It lands after the first one, at the same tempo, on the bar, already blended into it. A small pill marked BEATMATCH or CROSSFADE shows where the two meet.
- Keep going. Add more songs the same way, or load many at once: click one song, Shift-click another, right-click, Load to → Project.
- Listen to a blend. Click the time numbers on the ruler just before a pill and press Space.
- Change what you don't like. Move where the songs meet, or click the pill's name to pick another transition. Every step can be undone with ⌘/Ctrl + Z.
- Save, then export. ⌘/Ctrl + S saves the project. File → Export audio… makes the audio file.
1. Install and first start
What you need
- Mac: Apple Silicon (M1 or newer), macOS 13 or later.
- Windows: Windows 10 or 11, 64-bit.
- Your music as files: MP3, WAV, AIFF, FLAC, M4A/AAC, OGG and more. Streaming services can't be used.
- For Perform with a headphone cue: a sound card with four outputs (a DJ controller or audio interface).
Install on a Mac
- Download the DMG from the Download page, open it and drag GlideMix to Applications.
- Open GlideMix. It isn't signed by Apple yet, so macOS says it can't check it: click Done.
- Go to System Settings → Privacy & Security, scroll down and click Open Anyway. You only do this once.
- Allow access to the folders your music is in when macOS asks. macOS may also ask about your Documents folder when a plug-in keeps its presets there.
Install on Windows
- Run the setup. It installs for your user only (in
%LOCALAPPDATA%\Programs\GlideMix), no administrator password needed. - If SmartScreen says "Windows protected your PC", click More info → Run anyway.
- On Windows 11 with Smart App Control on, unsigned apps are blocked without a "Run anyway". Check it in Windows Security → App & browser control.
Faster analysis on Windows: Windows Defender scans every song GlideMix reads. In Windows Security → Virus & threat protection → Manage settings → Exclusions, add the GlideMix folder and your music folders. On a laptop, use the best-performance power mode while analysing.
The first start: Getting started
- Getting started sets GlideMix up in seven short pages. The recommended choice is already picked on each, and Skip setup on any page keeps what is set:
- Theme – light or dark.
- Waveform look – Transparent single wave (recommended), Single wave on colour, Dual (stereo) or Colour waveform, and the Interface size.
- Your music – add your music folder (the scan starts at once) and choose the analysis speed.
- Stems engine – install it now (free, about 1 GB, downloads once) or later.
- Keys, tempo and the DJ clock – Keylock, how keys are written, the clock readouts (Standard or Complete) and the flash before a mix.
- Plug-ins – add your own VST3 folders and press Scan for plug-ins.
- Workspace layout.
- The licence window opens: Continue with the demo, buy, or enter your key.
- GlideMix asks whether to check your audio plug-ins now or later.
- Click Audio setup at the top right of the window and choose your sound card.
How to make GlideMix bigger or smaller: Interface size
The whole window can be shown from 50 % to 200 %, for a small laptop screen or tired eyes.
- View → Interface size → pick a size, or Reset to 100 %.
- Or Preferences → Appearance → Interface size: a slider with 100 % in the middle, and Reset. It is also on page 2 of Getting started.
- GlideMix asks to restart: Restart now or Later. Started from Getting started, the wizard opens again on the same page.
When the header is full (a big size, a small screen), the DJ clock makes room by itself: Memory, Disk, CPU, Energy, Mix length, Phrase and Tempo step aside in that order, and come back when there is room.
Uninstall
- Mac: drag GlideMix from Applications to the Bin. Your library is in
~/Library/Application Support/Glidemix; delete that folder too for a completely fresh start. - Windows: Settings → Apps → Installed apps → GlideMix → Uninstall. Your library is in
%APPDATA%\GlideMix.
2. A tour of the window
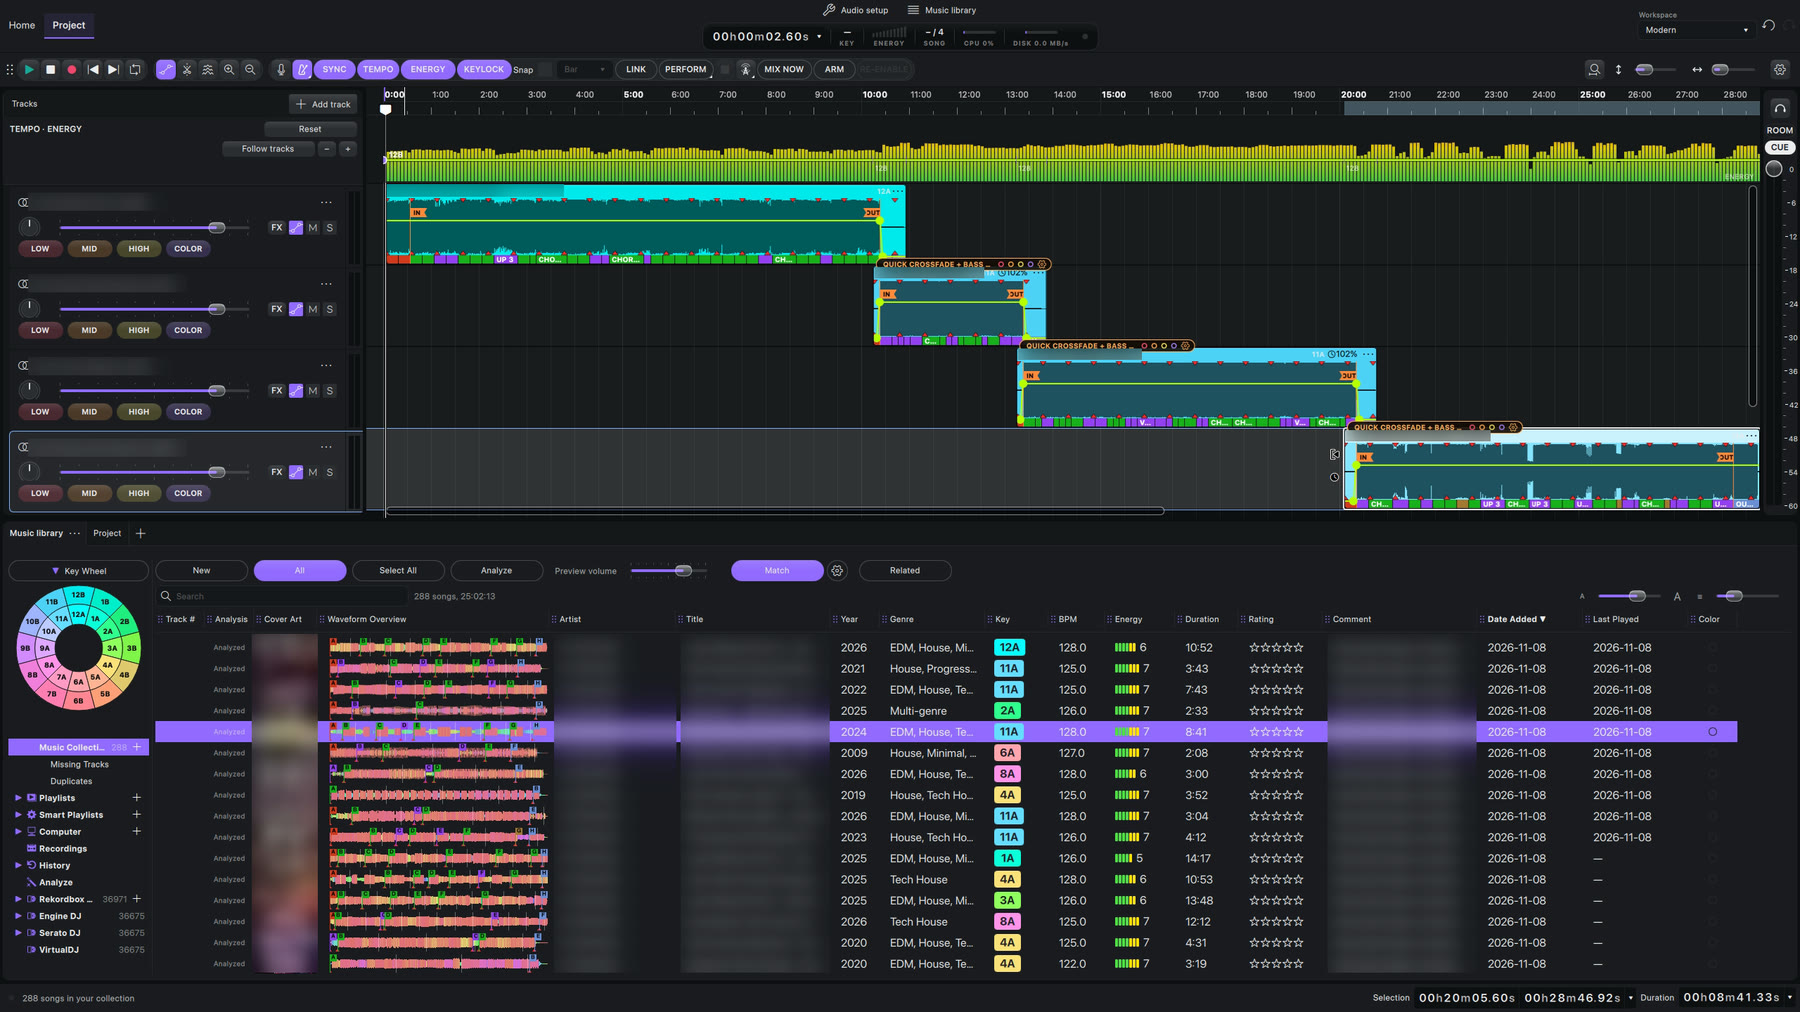 1
2
3
4
5
6
7
8
9
10
11
12
13
- Home and Project. Home has your recent projects and the Learn page. Project is where you mix.
- Audio setup (top right, beside Workspace): sound card and outputs.
- Music library (top right): shows or hides the library.
- The toolbar: play, stop, record, rewind, loop, editing tools and the DJ buttons (table below).
- The time ruler. Click the time numbers to move the playhead. Drag in the strip under the numbers to draw a loop.
- Tempo and energy of the whole mix.
- The track: one lane per song, with volume, FX, automation, mute and solo.
- The pill marks a transition.
- The song, with its IN and OUT markers and its phrases along the bottom.
- ROOM and CUE: meters and levels for the audience and your headphones.
- Music library and Project tabs: your music, and the songs of this mix as a list.
- The status line says what GlideMix is doing. Hover over any button and it explains that button. It also tells you when a new version is out. At its right end, the mix at a glance: tempo, selection in bars, the mix and its harmonic flow.
- The display: the time, and a DJ clock for the song under the playhead: time left, bar and beat, the next mix, key, place in the mix (song 2 of 4), plus how much processor, disk and memory GlideMix uses. The light is green while the mix plays.
The Workspace menu at the top right switches between layouts of the window.
The LED meter above the display is a light show of what the audience hears: low sounds on the left in red, high ones on the right in violet. It moves with Play and with Perform and goes dark when the music stops. Right-click it to hide it (and right-click the same spot to show it again).
How to read the DJ clock
The display at the top shows what a DJ deck shows, for the song under the playhead:
| Readout | What it shows |
|---|---|
| SONG LEFT | Time left in the song. Click it for the time played, or both. The thin strip under it fills as the song plays, in the colour of the phrase. |
| BAR | The bar you are in, counted in the song's own grid, and a dot for each beat. Beat 1 is red. |
| PHRASE | The phrase (CHORUS, VERSE…) and how many bars are left in it. |
| NEXT MIX | Countdown to the next transition (the song's OUT), in time and in bars. MIXING while it happens. |
| TEMPO | The song's BPM as it plays, and how far it is stretched (+2.3 %). |
| MIX LENGTH | How long the whole mix is. |
| KEY, ENERGY, SONG | The song's key, its energy (1–10) and its place in the mix. |
| CPU, DISK, MEMORY | How much processor, disk and memory GlideMix uses. The bars turn yellow, then red, when it gets busy. |
It flashes like a deck. While the mix plays, NEXT MIX flashes red in the last 32 bars before the next transition, and SONG LEFT flashes in the last 32 bars of the last song.
- Choose what shows: click the small arrow beside the big clock → Show, and tick the readouts you want. Complete shows them all; click it again for the standard set.
- Right-click any readout for the same list, and to switch Flash near the end off.
The mix at a glance, at the right end of the bottom bar:
- TEMPO: the tempo of the mix at the playhead.
- SELECTION: the part you selected, in bars and beats and in time, e.g. "16 bars · 0:31".
- MIX: the number of songs, the length and the tempo range, e.g. "12 songs · 1:04:30 · 118–128 BPM".
- HARMONIC: how many transitions are in keys that mix. Green when all of them are; yellow, with the first clash ("clash 3 → 4"), when one is not. See how to make two songs fit in key.
The DJ buttons

| Button | What it does |
|---|---|
| SYNC | Locks songs to the grid: the Snap value, or a bar when Snap is off. Mix Now lands on it too. |
| TEMPO | Shows the master tempo line above the tracks. |
| ENERGY | Shows the energy of the mix (1–10) over time, under the tempo line. |
| KEYLOCK | On: tempo changes keep the pitch. Off: songs play faster and higher, like a turntable. |
| Snap | Snap to the grid while moving and cutting: bar, beat or finer. |
| PERFORM | Plays the mix to the audience (red playhead, outputs 1–2). Play becomes your headphone cue. Right-click it for more. |
| Broadcast (tower) | Opens the Broadcast window to go on air. |
| MIX NOW | Pulls the next song forward so it mixes in at the next bar or phrase. |
| ARM | Records knob moves into automation while the mix plays. |
| RE-ENABLE | Turns automation back on for controls you moved by hand during playback. |
Make the toolbar yours. Right-click an empty part of the toolbar and choose Customize Toolbar… (or click the gear at its right end). Drag a button from the sheet into the toolbar, along it to move it, or out of it to take it off. Space adds a gap between groups; Flexible Space pushes everything after it to the right edge. Show picks icon and text, icon only or text only. Drag the default set up, or click it, to put the toolbar back as it came.
The track
 1
2
3
4
5
6
7
8
- Pan knob.
- Volume fader.
- FX: effects and plug-ins on this track.
- Automation: shows or hides the lines.
- M mutes the track.
- S solos it.
- ⋯ opens the track menu, which is also on a right-click on the track header: Separate stems, Move track, Color, Track visualization.
- LOW, MID, HIGH, COLOR: show that line over the whole song (below).
LOW, MID, HIGH and COLOR, the four small buttons under the fader, each show one line over the whole song: the bass, mid and treble EQ, and the Color filter. Click one, then draw on its line anywhere in the song, for example a quick bass cut in the middle of a track. Click it again to hide the line. Transitions write into the same lines, but only where two songs overlap.
Start, save and reopen a project
- New project: Home → Project → New, or File → New.
- Open one: click its thumbnail under New & recent, or use Open other… or File → Open recent. Each thumbnail shows how many songs the project holds.
- Save: File → Save project (⌘/Ctrl + S). File → Save project as… saves a copy under a new name.
- Rename: on Home, click the … on the project's thumbnail → Rename…, type the new name and click Save. Close the project first if it is open.
- A project keeps your songs, transitions, effects and automation. It is not an audio file: to get one, export.
3. The music library
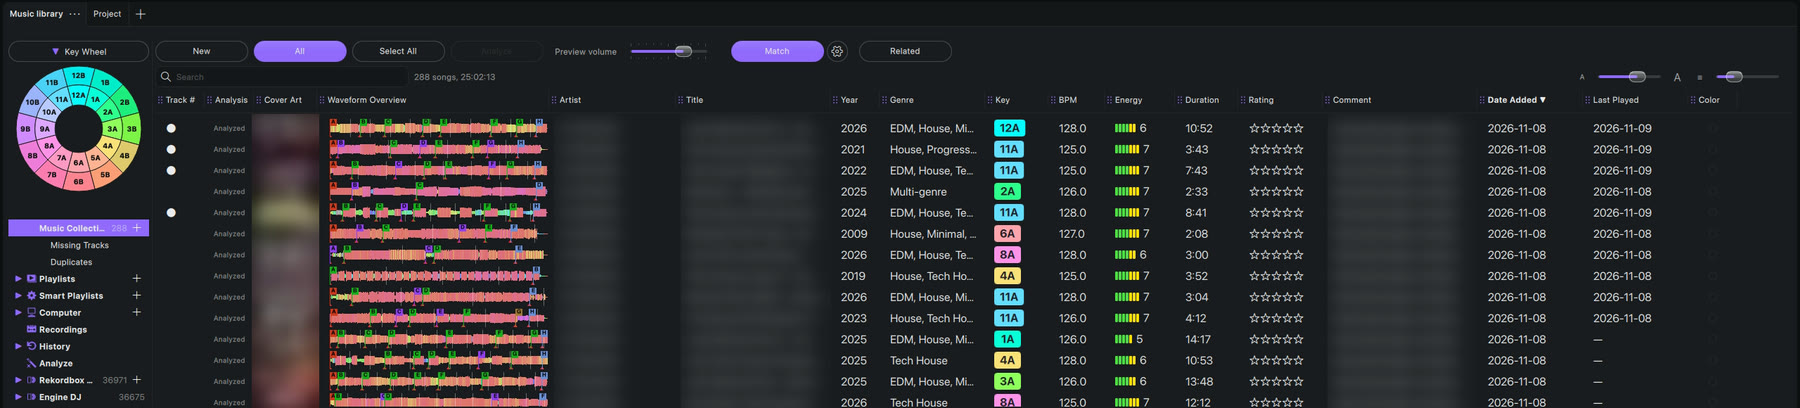
 1
2
3
4
5
6
7
8
- Music library tab.
- Project tab: the songs of this mix.
- Key Wheel shows or hides the wheel.
- New (songs never analysed) or All.
- Select All.
- Analyze the selected songs.
- Match lights the Key cell green on songs that mix with the one under the playhead; the cog next to it sets the rules.
- Related opens a tab with the songs that go with the one under the playhead. Its search box narrows them down, with the same search terms as the library. The songs that sound most alike come first.
The search box is just below these buttons.
- Above the list: the number of songs and their total length, for the whole list, a search or a playlist.
- + beside the search box saves the search as a smart playlist. ‹ Back appears after Show in Library and takes you back to the list, search and song you came from.
- The list keeps loading as you scroll, however big the collection. ↑ ↓, Page Up/Down, Home and End move through it; Shift extends the selection.
- A small dot marks songs that are already in your project.
- Closed a tab? The + beside the Music library and Project tabs opens it again.
How to add your music
Pick one of these. GlideMix scans the folder with all its subfolders.
- Click + next to Music Collection and choose a folder.
- Drag folders from Finder or Explorer onto the library.
- File → Add to Library: Add File(s)…, Add Folder…, Import from Rekordbox XML… or Import from iTunes Library XML….
- Preferences → Music library → Add. Use this for the folders GlideMix should keep watching.
Watch folders: while GlideMix runs it watches the folders in Preferences. A song copied or downloaded into one appears a few seconds later and, with automatic analysis on, is analysed right away. Both are switches in Preferences → Music library.
What is in the sidebar
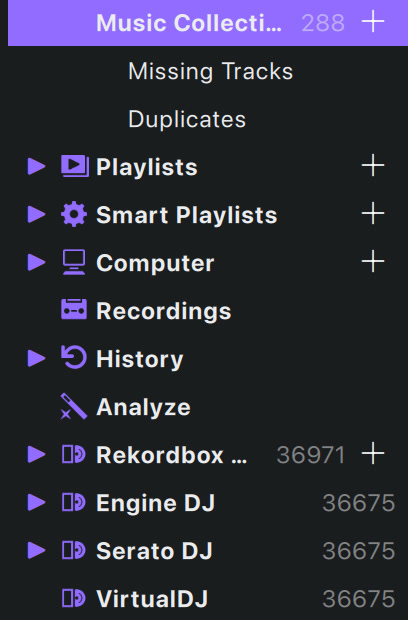
- Music Collection: your songs. Missing Tracks lists songs whose file has moved or been deleted; Duplicates: see below.
- Computer browses your disks without adding anything: Quick Links (Music, Downloads, Desktop, Documents and your own with +; right-click one → Remove from Quick Links) and Devices (USB sticks and drives).
- Recordings: your exported mixes. History: songs you have used in a project. Analyze: songs that still need analysis.
- Under them: Rekordbox XML, Lexicon DJ and any other DJ app on this computer (see below). Smart playlists, Duplicates and Analyze show their song counts.
How to use the library of another DJ app
Fastest start: analyse your whole library there first (in rekordbox with BPM/Grid, KEY and Phrase on), then open it in GlideMix. GlideMix takes their beat grids, keys, cue points and phrases as they are, so those songs need no analysis and are ready at once. Only songs those apps have not analysed are analysed by GlideMix.
Lexicon DJ: if you use it, its whole library shows in the sidebar with its playlists, beat grids, keys, energy, cue points and cover art. The switch is in Preferences → Music library → Other DJ Apps.
From rekordbox:
- In rekordbox, choose File → Export Collection in xml format.
- In GlideMix, click Rekordbox XML in the sidebar (or right-click it → Import from Rekordbox XML…) and choose the file.
- While a big file loads, the row shows Loading 42%. Then the song count appears and its playlists and folders open underneath.
Engine DJ, Traktor, Serato, VirtualDJ and djay: if one of them is on your computer, it appears in the sidebar by itself with its songs and playlists (crates in Serato). Nothing to export first.
- When GlideMix analyses a song one of these apps already knows, it takes that app's beat grid and key instead of working them out again. The order is rekordbox, Lexicon, Engine DJ, Traktor, VirtualDJ, Serato. From djay, GlideMix takes the tempo and key only. The beat grid editor says where a grid came from ("Grid from Engine DJ").
- Traktor on a Mac: Traktor keeps its collection in your Documents folder, so GlideMix reads it only after you click Traktor in the sidebar once. macOS then asks for access to Documents; after that it is read at every start.
- Mixed In Key: the key and energy it writes into the comment ("8A - Energy 7") are read when songs are added, analysed or imported from file tags, and win over GlideMix's own energy.
- Right-click one of their playlists → Export as M3U8 Playlist… to use it in another player.
GlideMix only reads these libraries; it never changes their databases. To copy rekordbox songs into your own Music Collection, use Copy Rekordbox XML into Music Collection… on the same right-click menu.
How to analyse songs
Analysis finds each song's tempo, beat grid, key, phrases (Intro, Up, Down, Chorus, Outro…), energy (1–10) and its colour waveform. A new song takes about a second on a Mac.
- Click New (songs never analysed) or All.
- Click Select All, or select only the songs you want.
- Click Analyze. You can keep working; analysis runs in the background.
- The status line at the bottom shows "Analysing 7 of 20" with a progress bar, the time left and Stop. Stop Analysis stops it; finished songs keep their results.
- Preferences → Music library → Analysis uses: Performance (all cores, fastest), Normal or Power saving (half the cores, for a laptop on battery).
- A song you double-click before it is analysed is analysed first, then joins the mix.
- A song without an energy rating gets one automatically a few seconds after it lands on the timeline.
- Songs added while analysis runs are analysed in the same run.
- If GlideMix is closed or stops during analysis, it carries on by itself at the next start. A file that stops it twice is skipped.
How to reanalyze a song with GlideMix's own grid
Analyze uses a grid from your other DJ apps when they have one. To let GlideMix find the grid itself, select the songs, right-click → Analyze and choose:
- Reanalyze: GlideMix's own grid, ignoring your other apps' grids. A song that drifts also gets a beat map that follows it.
- Reanalyze (constant BPM): one fixed tempo for the whole song.
- Reanalyze (variable BPM): a beat map that follows every tempo change.
A reanalysed song keeps GlideMix's grid from then on. Plain Analyze puts it back on the automatic choice. The key from your other apps is kept.
How to find the next song
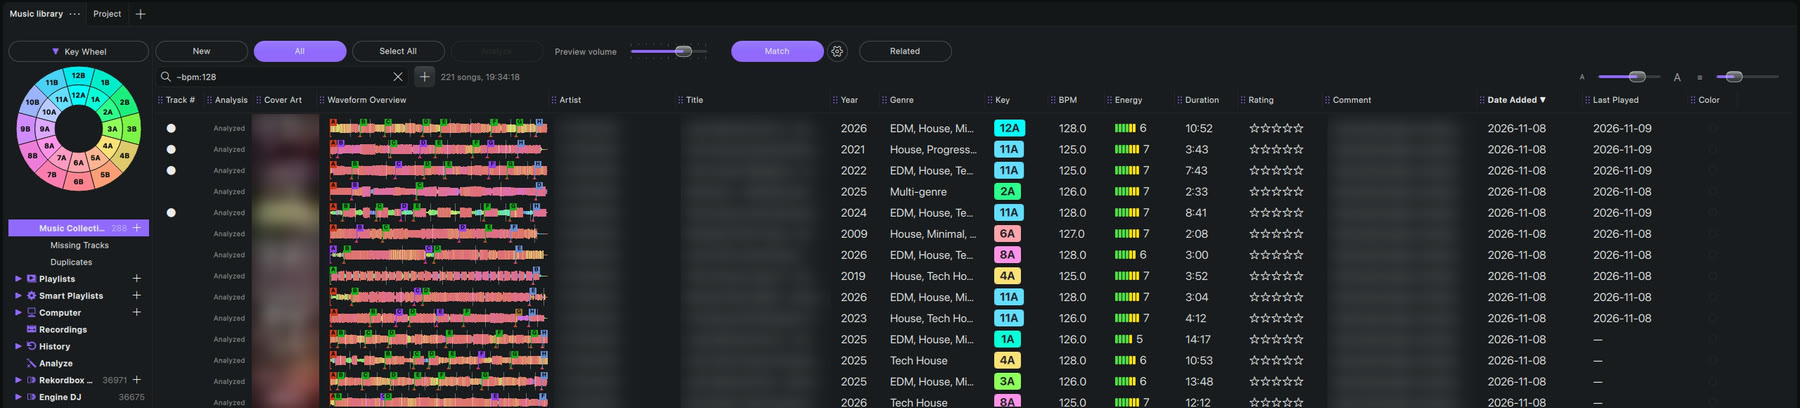
- Search in the box above the list. These terms work too:
bpm:128,~bpm:128(near 128),bpm:>125,genre:house,comment:andkey:8A, in any key notation (8A,1m,Am). Hover the search box to see all the filters. - Sort: click a column header. Drag a header to move its column.
- By key: click a key on the Key Wheel and only songs in that key stay. Click more keys to add them. Reset shows everything again.
- From a song: right-click it → Search related Tracks, then its artist, album, title or key. The search shows on the key wheel or in the search box, and one click clears it.
- Listen first: hover a song's cover art and click play, or click its waveform to preview from that spot. While your mix plays, the preview starts on the same beat of the bar, at the mix's tempo, so you hear how it would fit. The preview volume slider sits next to Analyze. The small waveforms show the song's cue points.
Sounds like: songs that sound alike
When GlideMix analyses a song it also takes a small sound fingerprint of it: its tone, how bright it is, how much bass it has and its groove, measured on the main parts of the song, not the intro. The fingerprint describes that one song; on its own it compares nothing.
- The comparison happens in Related. Related takes the song under the playhead and compares its fingerprint with every other song. Among the songs whose key and BPM mix with it (the rules behind the cog), the ones that sound most alike come first.
- The Sounds like column shows how alike: 85 % means the song sounds more alike than 85 % of your whole library. It is in the Related tab and in the main library (right-click the header to show or hide it): click its header to sort, closest songs first. Move the playhead to another song and the percentages change with it.
- Only songs that sound alike: in the Related settings (the cog), switch on Sounds like: at least N %.
- Songs analysed before version 1.2.6 get their fingerprint once, in the background, a few seconds per song (a few hours for a big library). It waits while music plays or while songs are being analysed. Until a song has one it shows — and sorts after the measured songs.
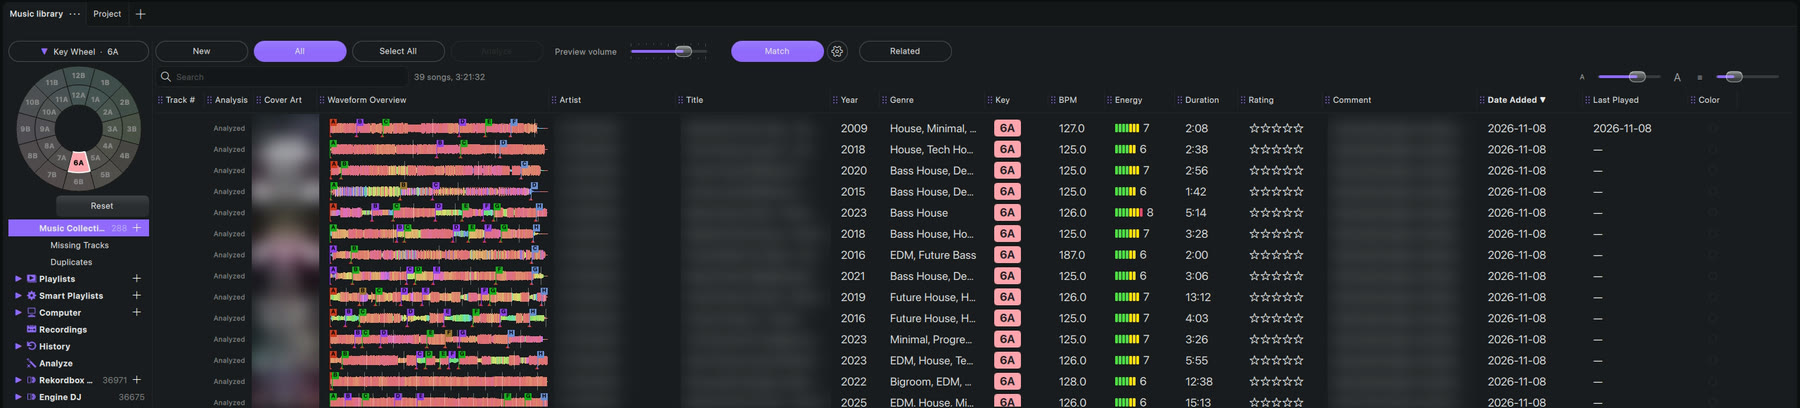
Select a song and the sidebar marks every playlist and smart playlist that contains it. Each list remembers its sort, scroll position and selected song while GlideMix runs. The two sliders above the list set the text size and the row height.
Columns
Right-click any column header to show or hide columns, and drag a header to move it. The less used columns sit in three submenus:
- Credits and extras: Album Artist, Composer, Grouping, Remixer, Mix, Label, Producer, Lyricist, Extra 1, Extra 2.
- Danceability, popularity, happiness, read from Lexicon.
- File and dates on the drive: Bitrate, ReplayGain, Type, Location, Samplerate, Channels, Date Modified, File Modified, File Created and Size, the last three read from the file itself on your drive.
Remixer to Happiness come from Lexicon; songs from elsewhere leave them empty. Every column sorts with a click on its header.
The right-click menu on a song
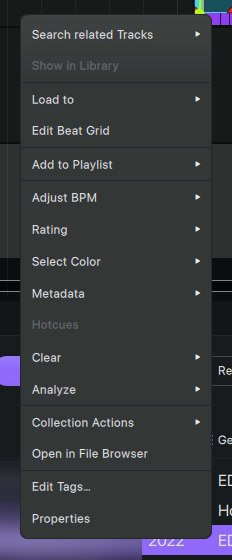
- Load to → Project adds the song, or all selected songs in order, to the end of the mix.
- Edit Beat Grid opens the beat grid editor.
- Adjust BPM: halve, double or fix a wrong tempo, and Lock BPM.
- Collection Actions: Remove from Library or Delete from Disk (the red one really deletes the file).
- Open in File Browser shows the file in Finder or Explorer. Properties shows the song's details.
How to change tags, ratings and colours
- Tags: right-click songs → Edit Tags…: title, artist, album, genre, year, comment and more, for one song or many. Edit Tags also has Key, Energy and Rating. A field shown as Mixed stays as it is unless you type in it. Tags are written into the music files too, so rekordbox and Lexicon see them after re-reading the tags.
- Changed a tag in another app? Right-click songs → Metadata → Import From File Tags. This also fills in ReplayGain, the comment and Mixed In Key's key and energy for songs already in your library.
- More columns: right-click a column title → Add Tag Column for any other tag in your files: Mood, Label, Remixer, MusicBrainz IDs and so on.
- Rating: click the stars. Click the same star again to clear it.
- Colour: right-click → Select Color for rekordbox's eight track colours. Ratings and colours work on Lexicon and rekordbox songs too (stored in GlideMix).
- Key style: Preferences → Music library → Key notation: Lancelot (8A), OpenKey (1m), traditional (Am) or both. Key column shows them as plain text, coloured text or coloured badges in the key wheel's colours.
How to make a playlist
- Click + next to Playlists and choose a playlist or a folder.
- Drag songs onto the playlist, or right-click songs → Add to Playlist.
- Drag playlists to reorder them or move them into folders.
Dropping a Finder or Explorer folder tree onto a playlist folder builds the same tree of playlists.
How to make a Smart Playlist
A smart playlist fills itself from rules.
- Click + next to Smart Playlists (New Smart Playlist…).
- Choose the source: your collection, Lexicon, rekordbox or all of them.
- Add rules: genre, artist, BPM, BPM within ±%, key, key mixes with (harmonic neighbours), energy, rating, colour, year, bitrate, date added, last played, play count and more. A live count shows how many songs match.
- Save. Change it later with Edit Smart Playlist….
From a search: type a search (for example genre:house bpm:>125) and click + beside the search box. It becomes a smart playlist with a Search rule,
which you can also add to any smart playlist ("finds" or "does not find").
Make many at once: right-click Smart Playlists → Generate Smart Playlists for one per genre, per key or per energy level ("Genre · Techno", "Key · 8A", "Energy · 7"). Delete Generated Smart Playlists… removes them again.
How to find duplicates
- Click Duplicates under Music Collection. It lists songs that are in your collection more than once (same artist and title, same length), with the best copy first: WAV/AIFF/FLAC before MP3, then the higher bitrate.
- Click Select extra copies. All but the best are selected.
- Right-click → Collection Actions → Remove from Library or Delete from Disk.
How to get songs out of the library
- To a folder or USB stick: right-click a playlist → Export to Folder…. It copies the songs in order, with a track list and an
.m3u8. - Just the list: right-click a playlist, crate or smart playlist → Export as M3U8 Playlist…, for other players and DJ apps.
- To rekordbox or Lexicon: right-click Music Collection → Export to rekordbox XML…. It writes your songs and playlists with tags, stars, colours, beat grids and hot cues where each phrase starts, ready for CDJs.
4. Building a mix
How to put songs on the timeline
- Double-click a song in the library: it joins the end of the mix, linked, wherever you are.
- Drag a song onto the timeline: use this to place it yourself. The label on it shows artist and title. Dropped near another song's OUT, its IN snaps onto it.
- A whole range: click a song, Shift-click another, right-click, Load to → Project. They join the end in the same order, each one blended into the next. Cancel stops the load and keeps the songs already in the mix.
Each song gets its own lane and lands beatmatched: stretched to the mix tempo and locked to the bar, with its IN on the previous song's OUT. Every new pair gets your default transition, Volume Fade unless you chose another. Delete a song (click its name bar, then Del or Backspace) and its lane goes with it; the ones after it close the gap. Adding a song moves only the new song: the transitions you shaped by hand stay as they are.
Moving around: ⌘/Ctrl + F fits the whole mix on screen. The sliders at the top right set lane height and zoom. Reset view, in front of them, puts the lanes back at their default height with the first songs readable.
How to change the order: the Project tab
 1
2
3
4
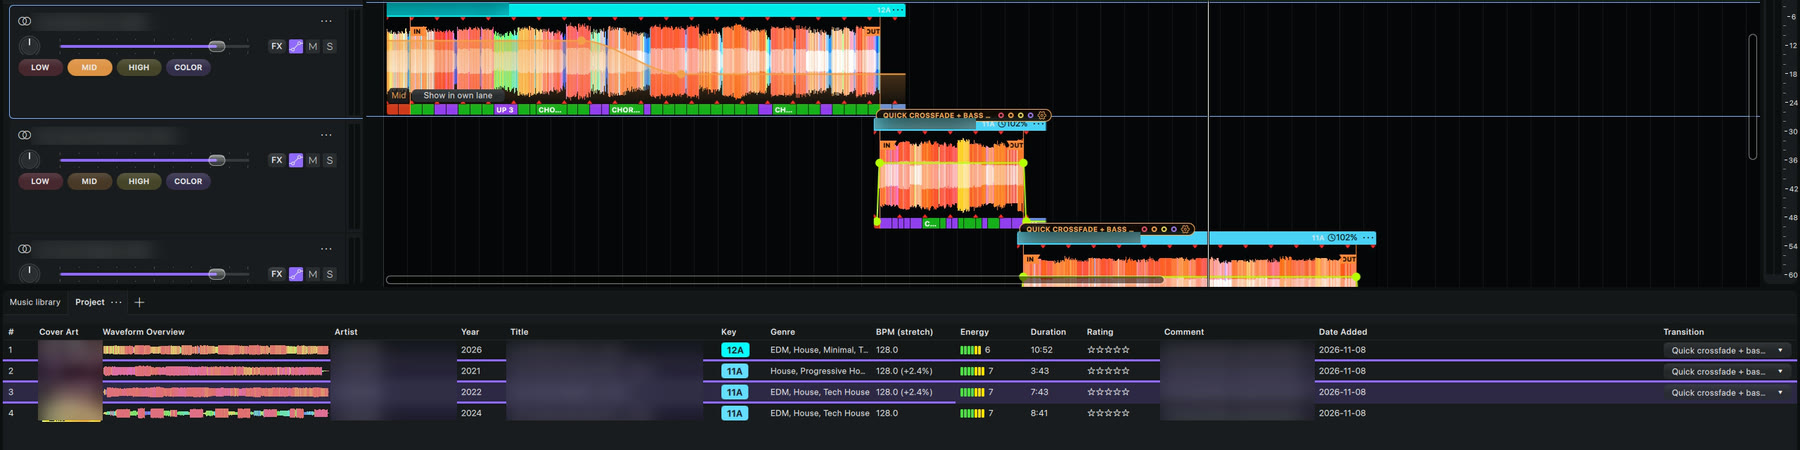
- The Project tab, next to Music library. It lists the songs of your mix in order, with the columns of the library and the tempo each song really plays at (BPM (stretch)). Scroll sideways for more columns.
- Drag a row to reorder. Every song moves so its IN sits on the previous song's OUT, the lanes follow, and the changed pairs get their transition again. One Undo puts everything back. Click a row and the timeline zooms to that song.
- Pick a transition in the row's drop-down: yours from Preferences, or MixMeister's classic Beatmix ones. It is saved with the project.
- The thin bar under each row shows how far the song has played. Click it to jump there.
Right-click a song here → Show in Library finds the track, its album or its artist. Songs on the timeline and in a playlist have Show in Library too. ‹ Back returns you to where you were.
How to change where two songs meet: IN and OUT
 1
2
3
4
5
- IN: where this song mixes in.
- OUT: where it mixes out.
- Phrases (right-click the song → Show phrase detection shows or hides them).
- Volume line. It shows from the start; the track's automation button hides it.
- ⋯ opens the song's menu, the same as a right-click on it.
By default the IN sits where the music really starts and the OUT stays on music that is still loud, so the mix never falls silent between two songs.
To change it:
- Drag the IN or OUT marker to another spot. Every song after it moves along, so IN and OUT stay together, and the fade is redrawn from the new spot. Dragging an IN slides the song under the mix point: you pick which part of it comes in.
- Or put the playhead there, right-click the song → Anchors → Set IN anchor here or Set OUT anchor here. Reset anchors goes back to GlideMix's choice.
- Or from the keyboard: select the song, put the playhead there and press ⌥/Alt + I for the IN or ⌥/Alt + O for the OUT.
- Drag the whole song onto the other one: its IN snaps magnetically to the other song's OUT and the two are linked.
The silent part shows faintly. Before the IN (and after the cut at the end) a song is silent, but its waveform is still drawn, pale. So while you drag the IN you see the drops and breaks you are moving past.
Sync, Snap and the beat grid
With SYNC on, songs move in steps of the Snap value (a bar when Snap is off), so they always stay on the beat. To move a song freely, turn SYNC off first. The bar and beat lines run behind the lanes (View → Show beat grid).
A song that jumps off its grid. A few songs don't sit on one steady grid: demos stitched from loops, edits, mashups. Part-way through, the beats move a little, and from there the metronome and your other songs flam against the kicks. GlideMix never cuts a song by itself. To fix one:
- Right-click the song on the timeline → Split at grid jumps.
- GlideMix cuts just before each jump and puts every part back on the bar. If it finds nothing, it says so.
- Undo puts the song back together.
How songs stay on the beat all the way through
Many songs don't keep one exact tempo: a live drummer, a disco record, an old edit. GlideMix follows each song's real beats, not just its average tempo. While the mix plays, such a song is bent onto the grid beat by beat, so two songs stay locked from the first bar to the last. You don't do anything for it: drag or double-click songs as usual.
- GlideMix takes the best beat map it can find: Serato's, then its own analysis, then Lexicon's. Steady songs simply play straight.
- The waveform is drawn bent too, so the kicks you see sit on the grid lines.
- With SYNC off, a new song still lands on the nearest beat, so it never flams against the mix.
- Songs opened with File → Import are beatmatched like a drop.
To check a song by ear: open it in the beat grid editor, press the metronome button and PLAY. The metronome follows the song's tempo changes. Its small arrow menu can make it follow another app's beat map instead.
If a song still drifts, reanalyze it with Reanalyze (variable BPM).
How to see the beat grid through the songs
The ruler counts bars and beats, like any DAW, and the bar and beat lines run inside the songs too. For seconds instead, right-click the ruler → Minutes & seconds.
To see the grid behind the waveform, switch the song's colour box off:
- Every song: View → Transparent clip background.
- One track: right-click the song, or the track's ⋯ menu → Color → See-through. Or Color → Intensity… and tick Invisible track background. Do it again to bring the colour back.
The name bar at the top keeps the song's colour, so you still see which song is which.
How to use Mix Now
For when the next song should come in sooner than planned.
- In Preferences → Transitions, choose where it Lands on (the next bar, or the next phrase so a drop lands on a drop) and which Transition it uses.
- Play the mix.
- Press MIX NOW. The next song is pulled forward and mixes in there.
How to loop and repeat a section
- Draw a loop: drag in the strip under the time numbers of the ruler. The loop shows there in purple and plays at once. Drag its edges to make it longer or shorter, drag its middle to move it, and click it (or press L) to turn looping on or off. Dragging somewhere else in that strip draws a new loop. A click on the time numbers only moves the playhead. Right-click the ruler for Loop on/off, Clear loop and Loop the selection.
- Loop part of a song: drag over the song's waveform to select it. Right-click the selection → Loop (or Shift + L).
- Cut part of a song: select it, right-click → Split (⌘/Ctrl + E). The song is cut at both ends of the selection.
- Repeat a section: select it and press ⌘/Ctrl + D. A copy goes right after the selection on the same lane (over what was there), and the selection moves onto the copy, so pressing again keeps repeating it. With SYNC on the selection snaps to whole bars first. A selected song repeats right after itself the same way.
How to change the tempo
 1
2
3
4
Press TEMPO to show the line. Then:
- Reset returns every track to its real BPM.
- Follow tracks: each song plays at its own tempo, and where songs overlap the tempo glides from one to the next. A song more than 8% away from the mix (122 into 140) turns this on by itself. Drawing on the line turns it off and keeps your line.
- − and + make the whole mix 1 BPM slower or faster, keeping the line's shape.
- BPM markers on the line show the tempo at every transition, so you can see it without scrolling back.
Double-time songs: a slower song mixed into a faster set (125 into 175) is matched double-time, so its beats land on every other beat of the mix. The markers, the clock and the bottom bar show the tempo you hear (125). With a flat line such a song is slowed down to fit; Follow tracks plays it at its own tempo.
The tempo line, Follow tracks and the −/+ Master BPM are saved with the project.
To shape it yourself: draw on the line, or drag its points. Right-click a point to choose how the glide moves: S-curve (smooth, like a hand on the pitch fader) or straight, or Set tempo… to type an exact BPM.
How to keep the pitch when the tempo changes: Keylock
The KEYLOCK button in the toolbar decides what a tempo change does to the sound.
- On: songs get faster or slower and keep their pitch. A song sounds the same, only at a new tempo.
- Off: songs play like a record on a turntable. Faster is also higher, slower is also lower.
Keep Keylock on for big tempo moves. Off sounds natural only for small moves of a few percent, like nudging a turntable. A bigger move changes the key you hear: a 145 BPM song pushed to 187 BPM plays 29% faster, and with Keylock off it is about 4½ semitones higher. The kick and bass move up and lose their weight, voices sound thin, and the song can seem filtered, as if its bass were cut. That is the pitch, not a broken transition.
Tip: if a song suddenly sounds thin or squeaky while the tempo glides in a transition, check KEYLOCK first.
How to make two songs fit in key
- Overlap the two songs.
- Right-click one of them. The menu offers Match key to the other song, showing both keys and the number of semitones.
- Click it. Or use Transpose on the same menu to shift the song by semitones yourself.
KEYLOCK on: tempo changes keep the pitch. Off: songs play like on a turntable. To find songs that fit before you start, use the key wheel or a smart playlist with mixes with.
How to read the energy of the mix
Every song has an energy rating from 1 (calm) to 10 (peak time), shown in the library as LED blocks (one per point) and the number. Lexicon songs keep Lexicon's rating.
Press ENERGY to see the whole mix over time under the tempo line, drawn like a row of level meters: green when it's calm, yellow as it builds, red at the peak. You see how your set builds, where it drops, and where two loud songs sit next to each other.

Colour waveforms
Songs are drawn in colour on the timeline and in the library: bass red, mids green, highs blue. A drop comes out red or pink, a breakdown blue, vocals and leads green.

- View → Color waveform switches between this DJ style and the Classic waveform in the track colour.
- View → Track view shows every song as Waveform, Spectrogram, Multi-view, Half-wave or Single wave. New installs start with Single wave: one waveform in half the height, so more of the mix fits on screen.
- For one track only: right-click the song or the track name → Track visualization or Color (Color by key, Clip color, Track color, Intensity).
- Preferences → Waveforms has the background and beat lines.
How to choose a transition
Two overlapping songs make a transition, and a small pill marks it.
 1
2
3
- The name. Left-click it for the list of transitions: Crossfade, the built-in ones (bass swaps, filter sweeps, a riser, echo and reverb outs and more) and your own. Remove transition is there too. Right-click it to switch the transition off: its fades, EQ and effects go and the pill turns grey. Right-click again to bring it back.
- The dots show one line of the transition on the songs: Low, Mid, High and Color (hover a dot for its name; the volume line is always on the song). Click again to hide it.
- The cog opens the transition window, or the DJ mixer if you chose that.
You can also pick a transition in the Project tab. Your own transitions come first in every list. To hide the ones you never use, open the list from the pill's name and untick them under Show in menus at the bottom.
The default: Volume Fade
MixMeister's fade, the one DJs asked for. The playing song stays at full volume up to its OUT, slides to half volume (−6 dB) over 8 bars and then cuts. The next song starts on its IN at half volume and rises to full over the same 8 bars. It touches only the volume, not the EQ.
The GlideMix transition is one right-click away (on the IN or OUT flag, or in the pill's list as Quick crossfade + bass swap): the new song fades in before its IN, the old one fades out after its OUT, and the bass changes hands on the beat where they meet.
Your default is set in Preferences → Transitions. If you had picked one there by hand, it stays: choose Volume Fade to get it.
How to change a transition by hand
- Click the cog on the pill. The transition window opens, with Song out and Song in side by side.
- Put the playhead inside the overlap.
- Turn High, Mid, Low and Color, click kill, or move the VOL fader. You hear it while you turn. Stopped, a turn sets one point at the playhead. While playing, the move is recorded as you make it.
- Add effect adds one inside the transition only: a filter sweep, echo or reverb out, noise riser or downsweep, vinyl brake, tape stop or beat roll. Each gets its own on/off, amount and remove.
Each move is one undo step. The knobs follow the playhead, and Presets switches to another transition.
How to build your own transition
- Open Preferences → Transitions. Click New, or pick a built-in one and click Duplicate.
- Give it a Name and a Length.
- Set the four lanes, Volume, Bass, Mids and Highs. For each, choose a Curve (crossfade, fade in, fade out or swap), a Shape (equal power, linear, S-curve, early or late) and how strong it is. A swap has a Crossing point. Leave out keeps the incoming bass away for a few beats, so the low end never doubles up.
- Add Effects if you like: Filter, Noise and Effect out. The Preview draws the result.
- Click Save. It now shows in the pill's list and the Project tab. Use for Mix Now makes Mix Now use it.
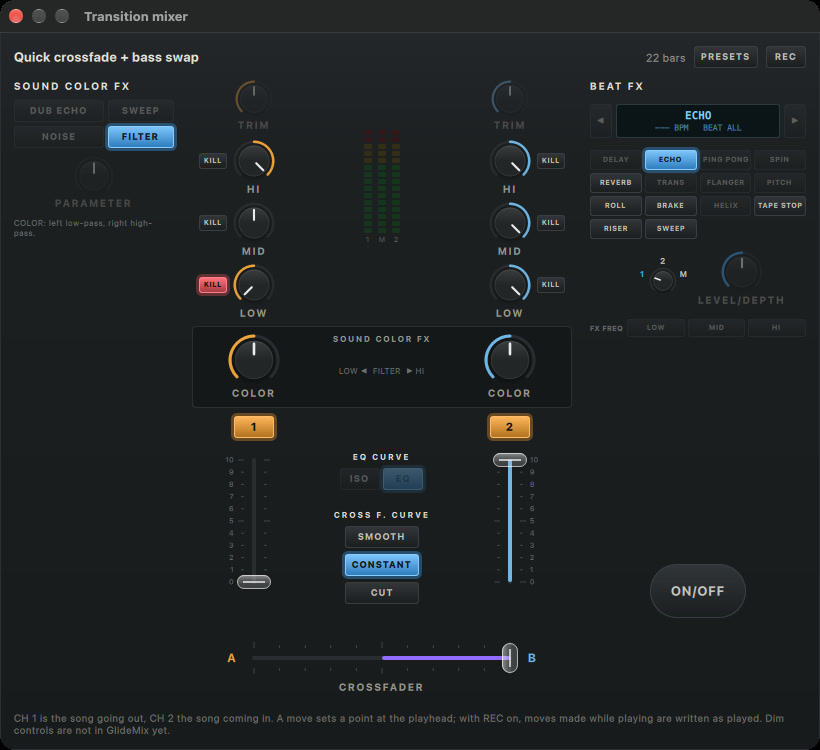
How to mix a transition on the DJ mixer
A transition can also open as a 2-channel mixer, laid out like a Pioneer DJM.
- Switch it on once: Preferences → Transitions → The transition pill opens: The DJ mixer.
- Click the cog on a pill. CH 1 is the song going out, CH 2 the song coming in.
- Put the playhead inside the overlap. A move sets a point there.
- To play it by hand: switch on REC, press play and ride the knobs and faders. Each move is written into the transition when you let go, one undo step per move.
 1
2
3
4
5
6
7
8
9
10
11
- HI, MID, LOW: the transition's EQ for each song.
- KILL drops that band to nothing. Click again to bring it back.
- COLOR: one filter knob per song. Left of the middle closes a low-pass, right opens a high-pass.
- Channel faders (0–10): each song's volume line.
- Crossfader: moves both volume lines at once.
- CROSS F. CURVE: Smooth (equal power), Constant (both full in the middle) or Cut (full until the very end).
- BEAT FX: pick Echo, Reverb, Roll, Brake, Tape stop, Riser or Sweep.
- LEVEL/DEPTH: how much of it.
- ON/OFF: switches it on. The effects on the transition are listed underneath; × takes one off.
- REC: writes your moves while playing.
- PRESETS: switches to another transition.
Dim controls (TRIM, the meters, Dub Echo, Sweep and Noise, Parameter, the beat length, FX frequency, EQ curve and some effects) are not in GlideMix yet.
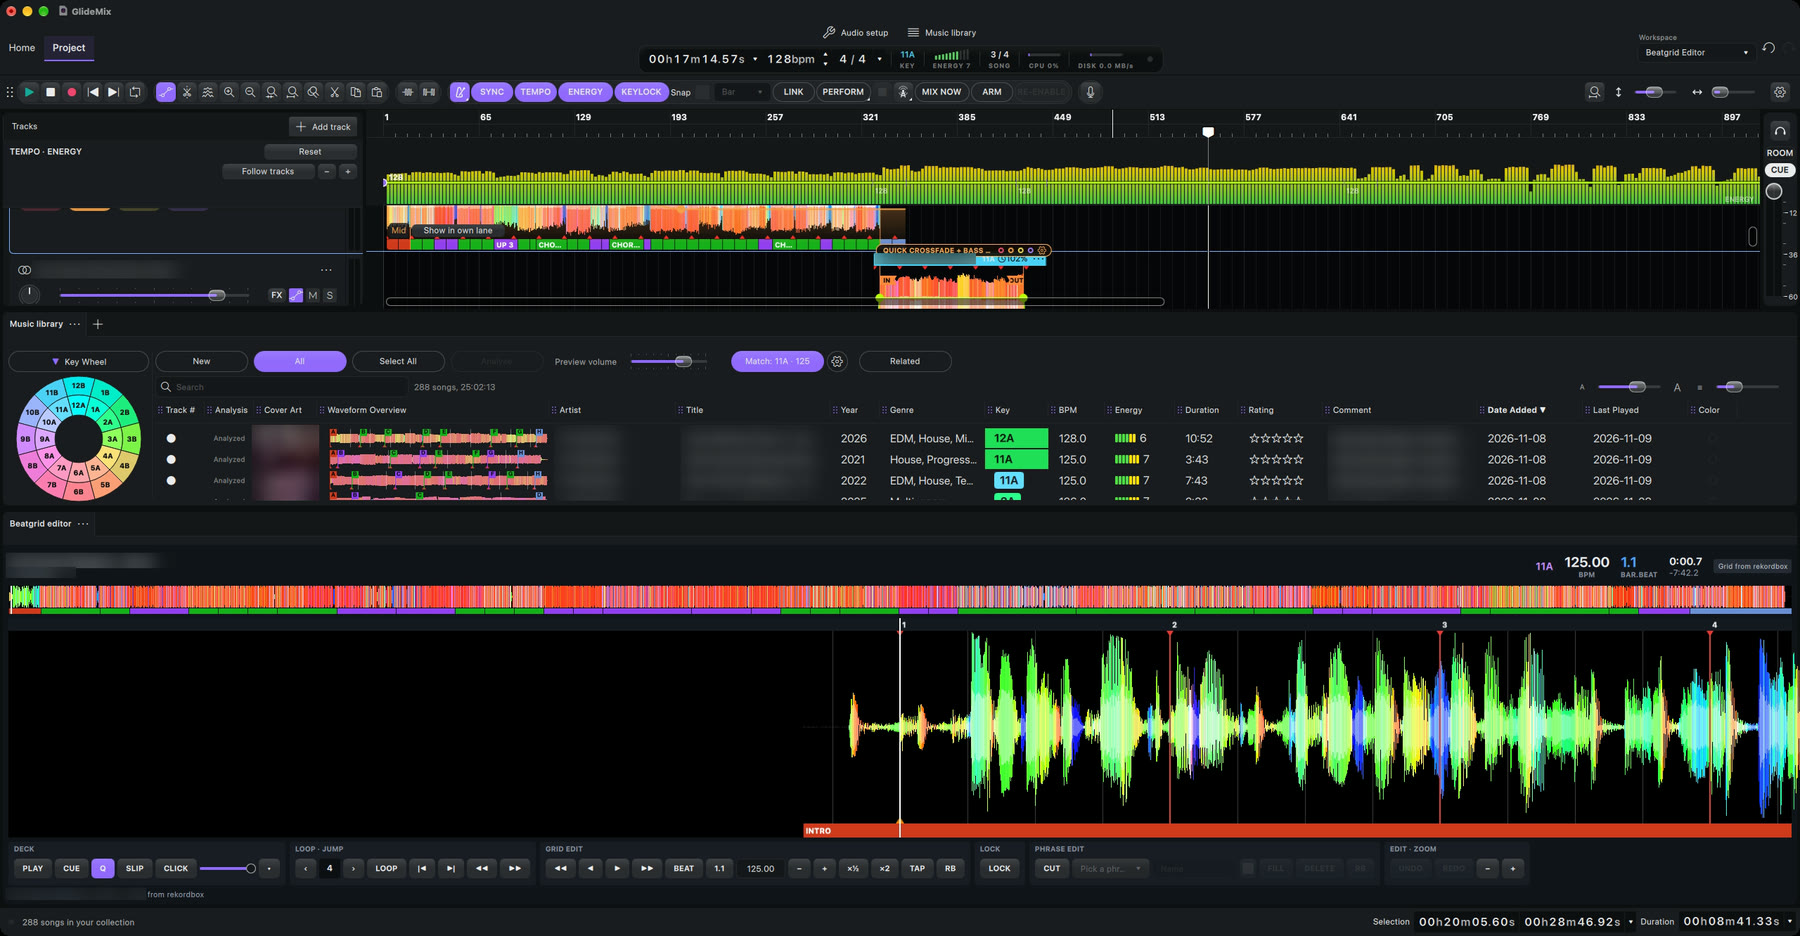
How to fix a song that is off the beat
- Right-click the song on the timeline → Beat grid → Open in Beatgrid editor, or right-click it in the library → Edit Beat Grid.
- Press the metronome button and PLAY (or Space). The metronome shows by ear whether the grid sits on the kicks, also in songs whose tempo changes.
- Use the GRID EDIT buttons below to move the grid until it does.
- Press LOCK when it is right. A locked grid can't be edited or re-analysed by accident.
The fix is kept for every project, and every change can be undone.

| Group | Buttons |
|---|---|
| DECK | PLAY, CUE, Q (Quantize: cues, loops and cuts snap to the beat), SLIP, the metronome (right-click for level and sound; its arrow menu picks which beat map it follows). |
| LOOP · JUMP | Set the size in beats, LOOP, jump back and forward by that size, go to the previous or next phrase. |
| GRID EDIT | Arrows move the grid by 10 ms or 1 ms. BEAT: the nearest beat goes to the playhead. 1.1: the playhead becomes beat 1 of a bar. − and +: 0.01 BPM slower or faster. ×½ and ×2: half or double the BPM. TAP: tap four or more times on the beat. RB: put the imported grid back. |
| LOCK | Locks the grid. |
| PHRASE EDIT | CUT at the playhead, pick a phrase and change its name or colour, FILL (marks its last bar as a fill-in), DELETE (merges it into the one before), and put the imported phrases back. |
| EDIT · ZOOM | UNDO, REDO, zoom out and in. |
Quick nudges without the editor: right-click the song → Beat grid: move the grid 5 ms earlier or later, move the bar start one beat, or change the grid by 0.01 BPM. These have shortcuts too (see Help → Keyboard shortcuts).
5. Effects, plug-ins and automation
How to add an effect or plug-in
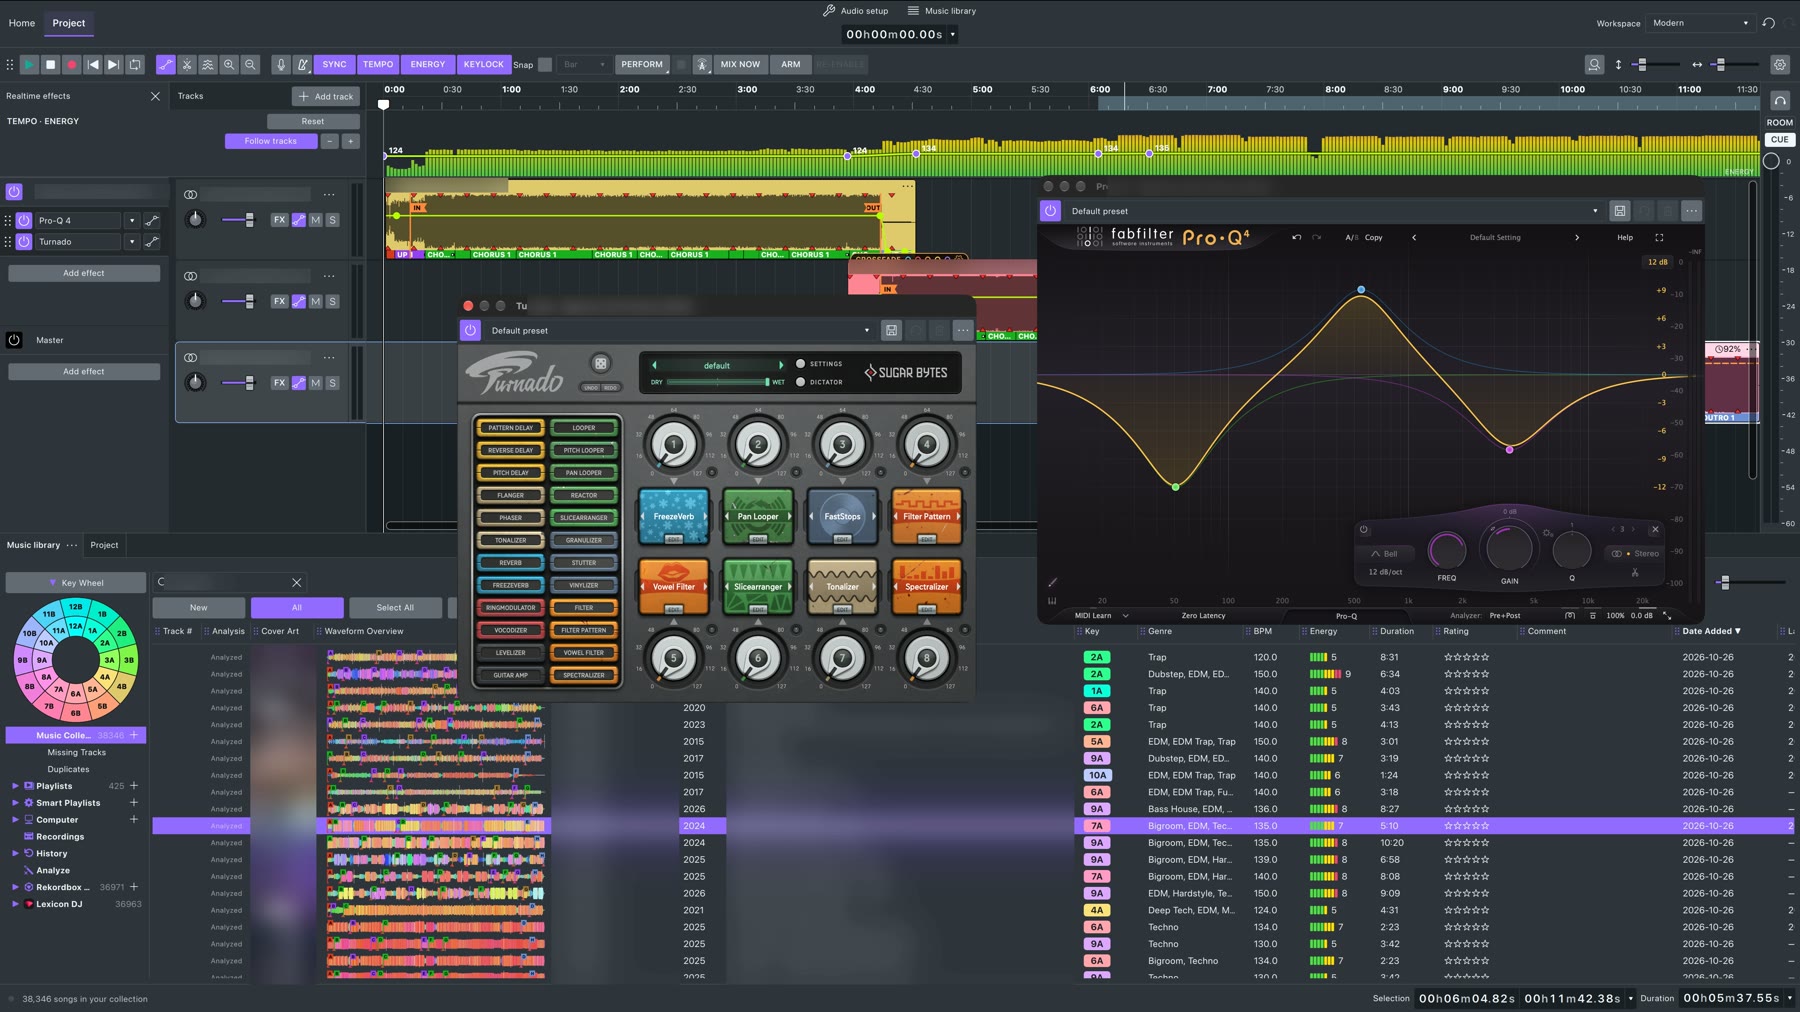
- Click FX on a track (a song or a stem). The Realtime effects panel opens at the left.
- Click Add effect and choose one. To put it on the whole mix, click Add effect in the Master part of the panel instead.
- Open the plug-in's own window, or turn its knobs inside GlideMix. The power button switches an effect on or off.
- Built-in DJ effects: about two dozen, tempo-synced, with presets: filter, echo, dub echo, ping pong, reverb, flanger, phaser, roll, tape stop, sweep, bitcrusher, EQs and more.
- Your plug-ins: VST® 3 on Mac and Windows, Audio Unit on Mac. They are checked once; new ones are found at start-up. GlideMix tells them the tempo (tempo lane glides too), the beat and the bar from your bar 1, so loopers, tape stops, beat gates and beat FX play in time.
- Manage them: Effect → Plugin manager lists every plug-in. Preferences → Effects has extra VST3 folders and how the menu is organised.
 VST® is a registered trademark of Steinberg Media Technologies GmbH.
If a plug-in crashes GlideMix
A plug-in that crashes GlideMix while loading, opening its window or playing is turned off on the next start, with a message naming it.
To try it again: Effect → Plugin manager, tick Include plugins with errors, then Rescan.
Since 1.2.2, AIR Music Technology plug-ins and others that bring their own copy of Qt (Serato Hex FX too) no longer crash GlideMix on the Mac. Please tell us which plug-ins still misbehave: the plug-in's name, VST3 or AU, Mac or Windows, and what happened.
How to draw automation
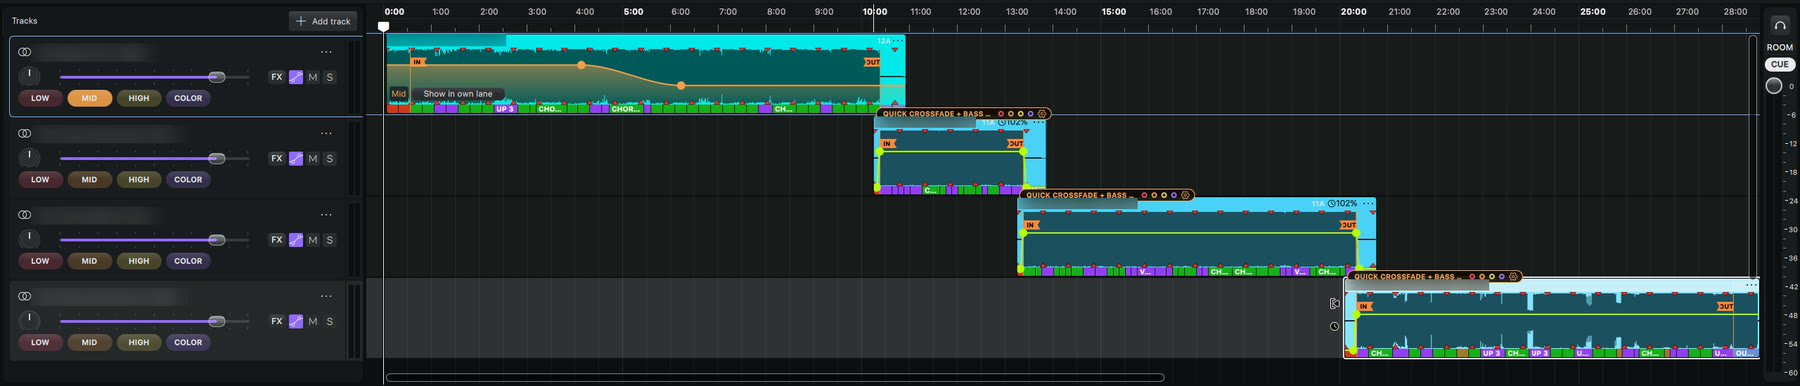
Every knob of every effect and plug-in can change over time. Volume lines show from the start. On every line, 100% (the normal level) sits at about three-quarters height and above it boosts. The ruler at the left shows the volume line in dB.
- Press A for Automation mode, or click the automation button on the track.
- For a plug-in, touch the control in its window: its line appears on the song, each knob in its own colour.
- Click the line to add a point, or press and drag to add one and move it in one go. Drag a point to move it; the nearest point is picked.
- Several at once: Shift-click points, let go of Shift, then drag one of them. They all move together.
- Right-click a point: Set value… (dB on the volume line, % on the others), Line: S-curve, Line: straight or delete it. Hold Option/Alt and drag a ramp to bend it into a curve.
- Optional: Show in own lane puts the line in a lane of its own under the track.
How to record automation
- Press ARM.
- Play the mix and move a knob. The move is written into its line.
- Let go, and the line plays on as it was.
Moving a control by hand during playback pauses its automation. RE-ENABLE turns it back on.
6. Samples
Your own sample packs and sound effects, inside GlideMix: find them like songs, hear them at the tempo of your mix, and drop them on a line right under any song.
How to add your samples: the Samples tab
- Open the Samples tab, next to Music library at the bottom of the window (if it's closed: the + after the tabs → Samples).
- Click Add sample folder… and choose the folder with your samples, for example your sample-pack drive.
- GlideMix reads every audio file in it in the background. A big collection (40,000 samples) takes a few minutes the first time, seconds after that. The status line counts your samples next to your songs.
- Categories and packs. The first folder level becomes the category tiles at the top (Kicks, Loops, Risers, FX…), the second level the packs. Nothing is moved or renamed: your files are only read.
- Tempo, key, loop or one-shot, bars are read from the file names, the way packs name them ("Top Loop 128 Am", "Kick 04").
- Find a sample: click a category tile, pick a pack, or type in the search box. Left and Right switch categories. Click a column header to sort, drag a header to move the column.
- Listen: click the play button or double-click a row. A loop plays at the tempo of your mix, over and over, at its own pitch; a one-shot plays once at its own speed. Click the waveform of the selected sample to play from there.
- Preview as you go: with Preview every sample you select on, Up and Down play each sample as you reach it. Space switches it on and off. The preview volume is the same slider as in the Music library.
- Folders lists the folders you added: remove one, or scan them all again after you added new packs. Removing a folder never deletes files. A folder on a disk that isn't plugged in keeps its samples, dimmed, until the disk is back.
- Right-click a sample → Show in Finder (Show in Explorer on Windows).
The sample line under a song
Every song lane has a SAMPLES button (make the lane a little taller if you don't see it). Press it and a lane called Sample line opens right under the song: that's where the samples for this song go.
- The eye inside the SAMPLES button hides the sample line completely, nothing left on screen, and brings it back. Hidden samples keep playing. Handy on a small screen or with the FX sidebar open.
- The sample line's own BEAT button (under FX / M / S) opens the Beat window.
- The sample line stays when you take its last sample off, and it is saved with your project.
How to put samples in the mix
- Drag a sample from the Samples tab (or a file from Finder / Explorer) onto a song's sample line.
- A loop lands on the nearest bar and follows the song tempo: a 128 BPM loop in a 124 BPM mix plays at 124, in time. A loop far from the mix tempo is played half or double time, whichever needs the smallest stretch.
- A one-shot (a hit, a riser, a vocal shout) lands exactly where you drop it and plays at its own speed.
- Drop the same loop on the same spot again and it goes right after the first one, on the next bar: nothing already there gets cut. Several files dropped at once line up one after another.
- Samples go on sample lines only. A sample dropped on a song lane is refused, and the status line tells you to press SAMPLES first.
- Right-click a sample on the sample line for its own menu: Follow song tempo on or off, rename, loop, split, reverse, pitch and speed, colour.
- Samples never count as songs: not in the SONG counter, not in transitions, not in the tempo line.
How to save part of a song as a sample
- Select part of one song on the timeline (drag across it).
- Right-click the selection → Save as sample…
- The name is ready, for example Song name 8 bars 128 Am: bars, tempo and key, so the Samples tab knows them. Change it if you like.
- Choose where. The first time it's the Samples folder inside your GlideMix Projects folder, after that the folder you used last. Any folder works.
- Save. The sample is in the Samples tab straight away, ready for any sample line.
The sample is the song's own audio, clean: at its own speed, without your volume line or effects. Samples you cut from other people's songs are for your own mixes: respect the rights of the music when you publish.
How to make a beat: the Beat window
A step sequencer for your own one-shots. The beat lands on the sample line as one loop that follows the song tempo.
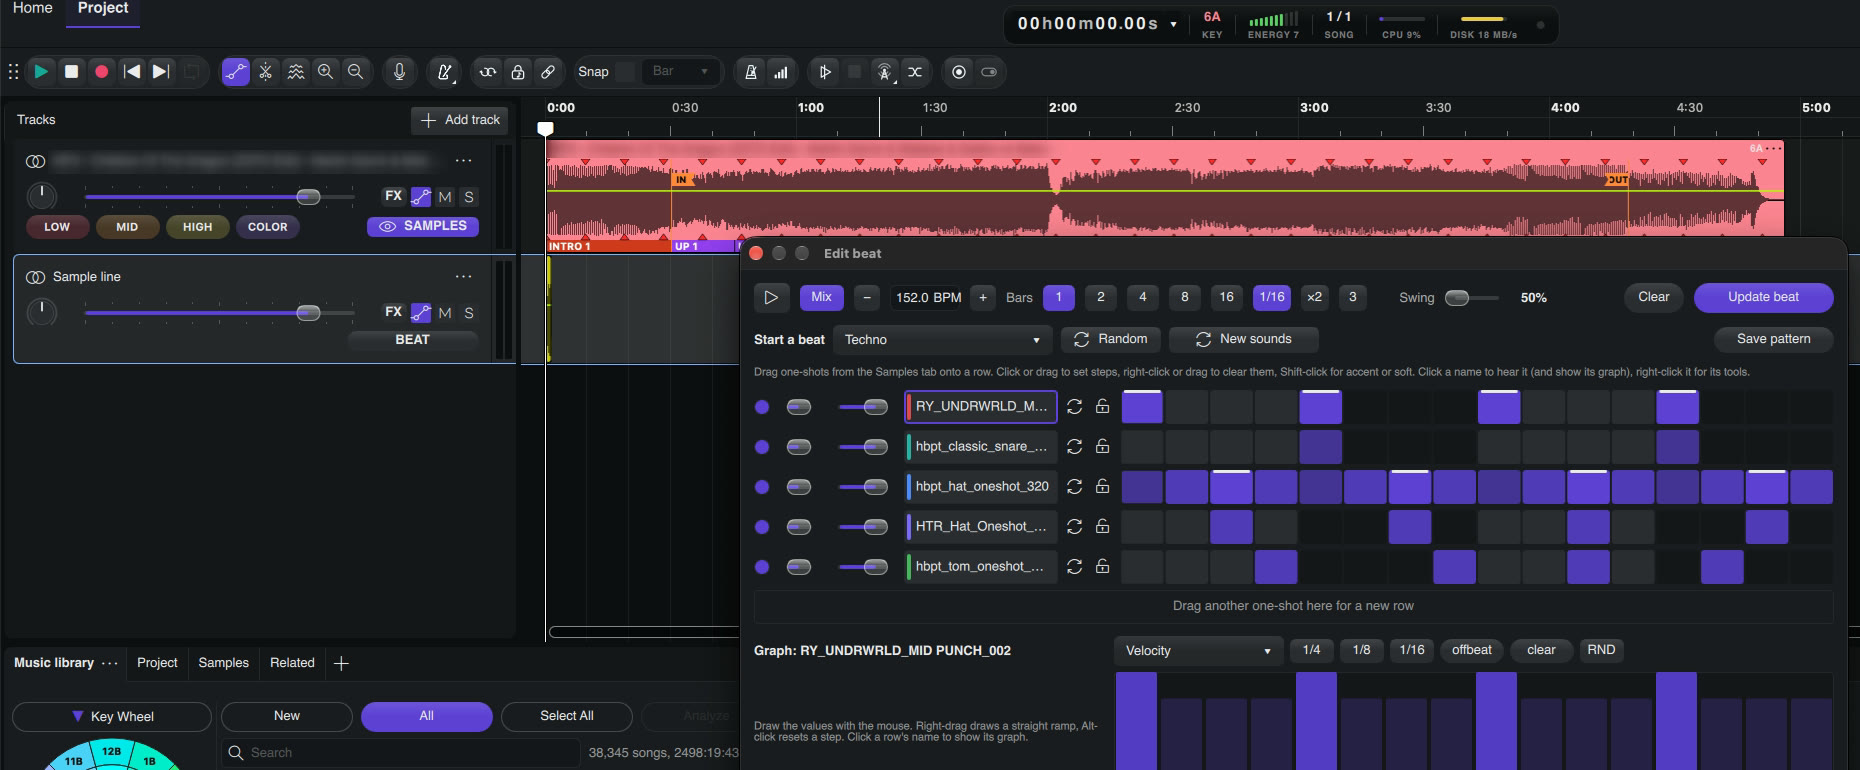
- Open a song's sample line and press BEAT on it.
- Drag a kick, a clap, a hat… from the Samples tab into the window: each becomes a row (up to 8).
- Click the steps to set them, right-click or drag to clear them. Shift-click for an accent or a soft hit.
- Press play: the beat loops at the tempo of your mix, the light runs over the steps.
- Press Put on sample line. The beat lands as one seamless loop on the bar under the playhead.
- Bars 1 to 16 (long beats scroll sideways), a grid of 1/16, 1/32 or triplets, and swing the MPC way (50 % straight, 54–58 % loose, 66 % triplet feel).
- Tempo: Mix follows the mix under the playhead; click it to give the beat its own BPM (− / + or type it).
- Each row: mute (right-click: solo), volume, pan, click its name to hear it. Right-click the name for its tools: fill every 1/2/4/8 steps, Fill in, Advanced fill (Euclidean rhythms, a cycle of its own), rotate, reverse, invert, copy and paste steps, Cut itself, choke groups (a closed hat stops the open hat), swing mix, Attack, Release and Key shift.
- The graph under the rows: click a row's name, pick Velocity, Pitch, Pan, Shift, Repeat (rolls), Length, Reverse, Distortion, Filter or Reverb, and draw the values per step. Right-drag draws a ramp, Alt-click resets a step.
- Beat starter: choose one of 18 genres (House to Dembow) or Random, and the rack fills itself from your samples with that genre's groove, swing and tempo. The dice on a row picks another sound of the same kind, New sounds changes every row that isn't locked, Tune to the song's key tunes a pitched sound to the song above.
- Save pattern keeps a beat in the genre menu under Your patterns.
- Change it later: right-click the beat on the sample line → Edit beat…; Update beat replaces it in place. Beats are saved in Projects/Samples/Beats and show up in the Samples tab too.
The right-click menu on a sample or a song
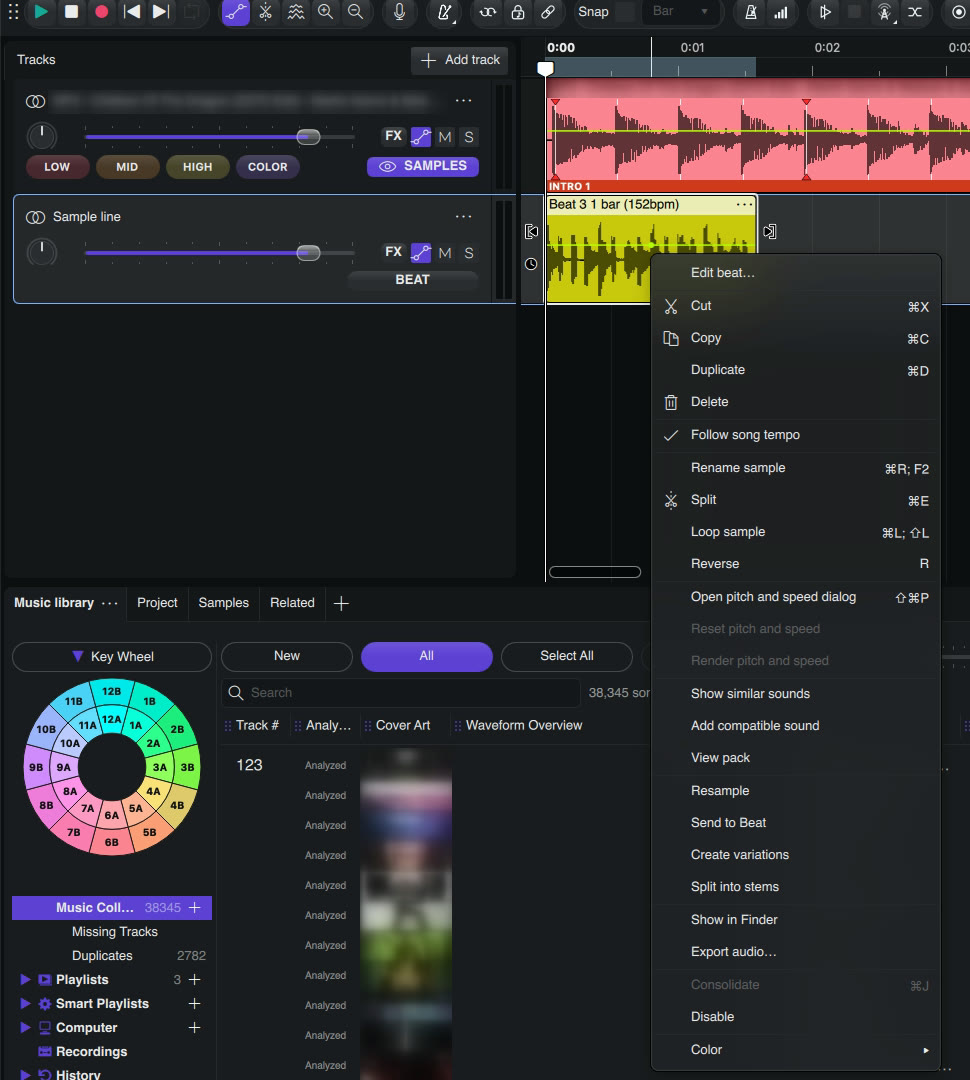
Right-click a sample on a sample line:
- Show similar sounds: the Samples tab opens with the sounds most like this one first: same kind, key, tempo and length. Click Similar to … ✕ to see all samples again.
- Add compatible sound: another sound of the same kind, in a key that fits the song, goes right after this one.
- View pack: the Samples tab opens on its pack.
- Resample: the sample as trimmed becomes a new sample (Samples/Resampled).
- Send to Beat: adds it as a new row of the Beat window.
- Create variations: four new sounds (Samples/Variations). A loop keeps its length: Reversed, Chopped, Stutter, Dark. A one-shot: Reversed, Up 5, Down 7, Dark.
- Split into stems, Show in Finder (Explorer on Windows), Export audio… (a WAV), Consolidate (joins the selected clips).
- Disable: the clip stays where it is, faded, but plays and exports silent. Enable brings it back. With several clips selected, they all switch.
Right-click a song on the timeline for Show in Finder, Export audio…, Split into stems, Resample, Consolidate, Disable, and Add compatible sound: a loop in a key that mixes with the song goes on its sample line, on the bar under the playhead (the line is made if it isn't there).
7. How to split a song into stems
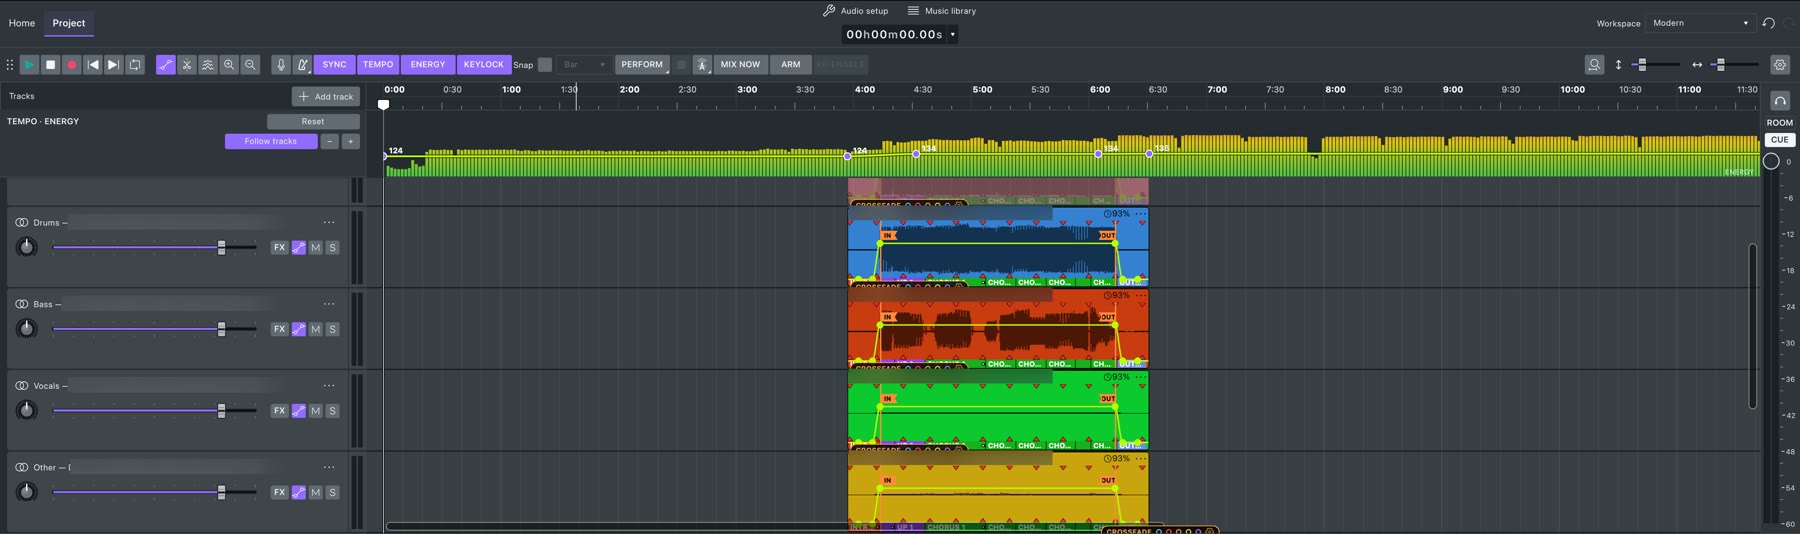
- Install the engine once: Preferences → Stems → Install stems engine. It is free, about 1 GB. Separate stems stays grey in the menu until this is done.
- Open the track menu (⋯ next to the track name, or right-click the track header) → Separate stems.
- Wait. On an Apple Silicon Mac a song takes about half a minute. On Windows it runs on the processor for now, so it takes longer. Nothing is uploaded: it runs on your own computer.
- Drums, bass, vocals and other land on their own lanes under the original, in sync, with the grid and phrases. The original is muted, not removed.
Mute, fade, filter or automate each stem on its own: drop the vocals of one song over the beat of the next, or bring in the bass only on the drop. One Undo removes the stems again.
Preferences → Stems also has the quality (Standard, or High: cleaner, about 4 times slower) and the cache. Separated songs are kept (10 GB by default), so the same song is instant next time.
Stems of part of a song
Select part of a song and right-click the selection. Two menus:
- Stems → Remove drums / Remove bass / Remove vocals / Remove other: takes that stem out of the selected part only, right in the mix. The rest of the song stays as it was. An acapella moment, a drum break, a breakdown without the vocal. Short fades at the edges, so there is no click.
- Stems → Split into stems: the selected part moves onto four stem lanes under the song (Drums, Bass, Vocals, Other), and the song goes quiet there. Mute, fade or move each stem for that part.
- Stems as samples → Drums, Bass, Vocals, Other or All four: saves those stems of the selected part as samples ("Song name drums 8 bars 128 Am"), in the Samples tab at once. The drums of 8 bars from one song, looped under the next one.
GlideMix separates the whole song once, then cuts out your selection: it sounds better at the edges than separating a short piece. The first time takes about half a minute for a song (with a progress window and Cancel); after that it's instant. One Undo brings the song back exactly as it was.
8. How to play live with a headphone cue
 1
2
3
4
5
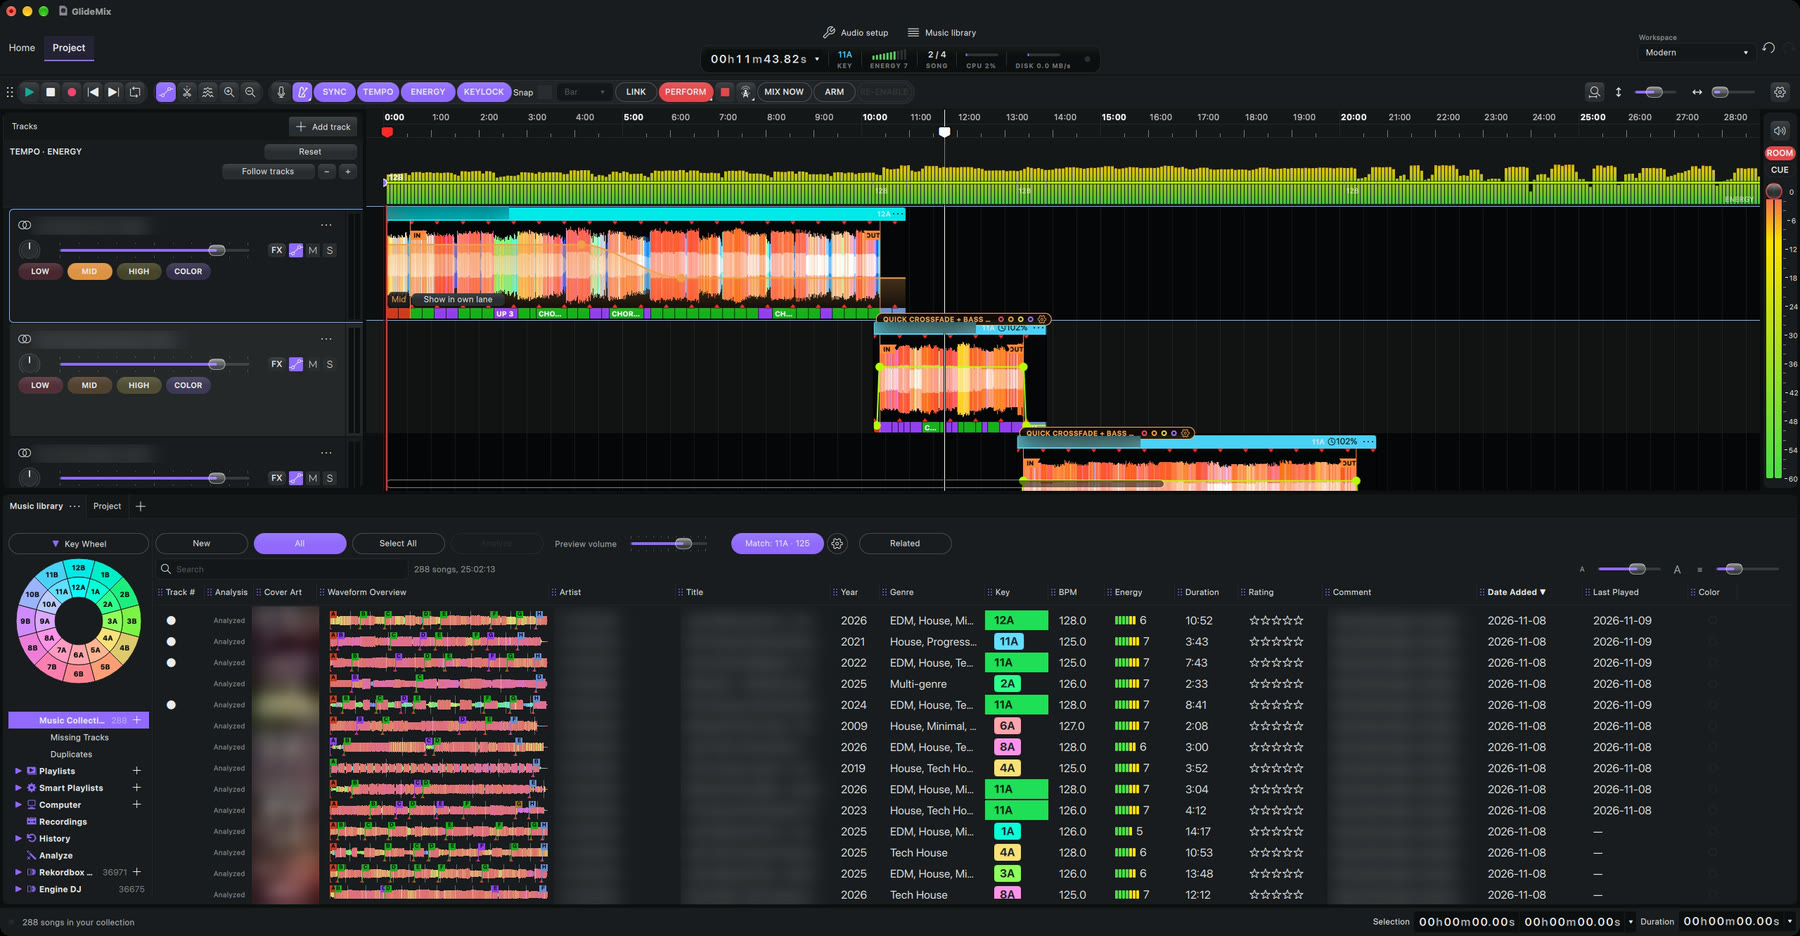
- PERFORM plays or pauses the mix for the audience.
- Stop, beside it, stops the audience and puts the red playhead back at the start.
- The red playhead plays to the room on outputs 1–2.
- The white playhead is your cue on outputs 3–4 (your headphones). Play moves it now.
- ROOM and CUE have their own meters and levels.
Step by step:
- Connect a sound card with four outputs. Choose it in Audio setup or Preferences → Audio settings, and set the headphone outputs there under Headphone cue. Right-clicking PERFORM also offers the headphone outputs.
- Press PERFORM. The room hears the mix.
- Click where you want to listen ahead and press Play. Only you hear it.
- Keep editing while it plays: move songs, change a fade, pull the next song in with MIX NOW.
- To jump the audience somewhere else: pause PERFORM, put the white playhead there, right-click PERFORM → Perform from the playhead, and press PERFORM again.
A DJ controller works as a sound card; its knobs and jog wheels aren't mapped.
How to sync visuals and other apps: Ableton Link
- Click LINK in the toolbar (between Snap and PERFORM). It lights up.
- Start Resolume, TouchDesigner or any other Link app on the same computer or network, with Link on.
- Play the mix. The other apps follow its tempo, beat and play/stop, tempo glides included.
GlideMix leads: your mix keeps its own tempo and does not follow the other apps. On a Mac, macOS may ask once for access to the local network.
 Play in time with Ableton Link
9. How to go on air
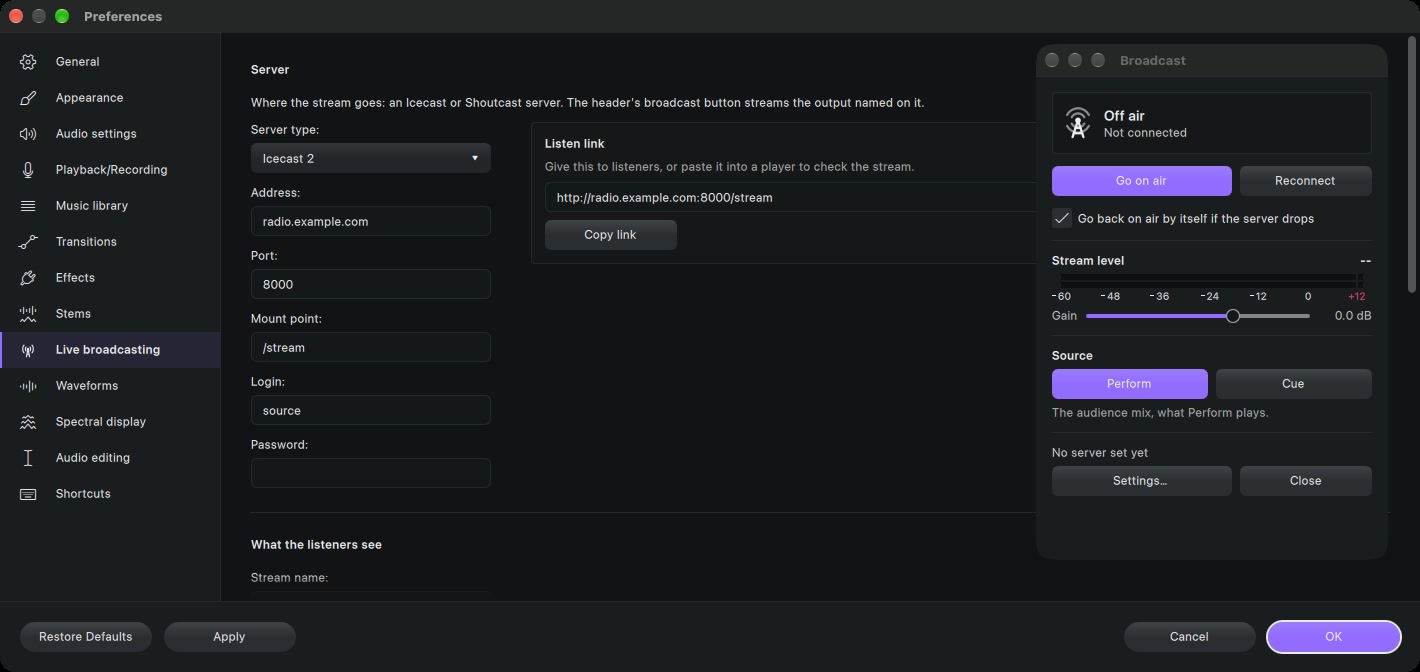
- Get the details from your radio host: server type (Icecast or Shoutcast), address, port, password, and mount point (Icecast) or stream ID (Shoutcast 2).
- Enter them in Preferences → Live broadcasting, with what listeners see: stream name, genre, website.
- Click the broadcast button (the tower) in the toolbar. The Broadcast window opens.
- Under Source, choose Perform (the audience mix, the normal choice) or Cue (for a test stream).
- Press Go on air, then press PERFORM to start the mix.
- Watch the Stream level and set the Gain. MP3 at 128 or 192 kbps suits most hosts.
- Share the Listen link (Copy link in Preferences).
- The title of the song playing goes to your listeners as Artist – Title.
- If the server drops, GlideMix goes back on air by itself, if that box is ticked. It stops if the server refuses the password.
10. How to export the finished mix
- Optional, for the tags and picture: Edit → Metadata editor. Fill in title and artist. Under Artwork, click Choose photo…. Click Apply.
- File → Export audio… (⌘/Ctrl + Shift + E).
- Enter the File name, the Folder and the Format: WAV, AIFF, MP3, FLAC, OGG and more. Set the channels and sample rate if you need to.
- Click Export. It is quick: a 16-minute mix takes under 30 seconds on our Mac.
- A loudness report shows LUFS, true peak and what Spotify, YouTube and Apple Music will do with the mix.
What you get:
- The audio file. It sounds exactly like playback, with the tempo line, transitions and automation.
- A tracklist beside it: a timestamped
.txtfor Mixcloud and show notes, and a.cuesheet. - Your artwork, title and artist inside the file.
- An entry under Recordings in the library.
Every export goes through a true-peak limiter at −1 dBTP, so it never clips, also after MP3 encoding.
How to export each track separately
- File → Export audio…
- Type → Export each track separately (stems).
- Choose the name, folder and format, and click Export.
You get one file per track: Name - 01 Track, Name - 02 Track and so on. They are all the length of the whole mix, so they line up when you drop them into another app at the start.
Each one sounds exactly like playback. Muted tracks are left out; solo tracks to export only those.
Demo: exports are MP3 at 96 kbps, up to 20 minutes, and a voice says "Glide Mix demo" every two minutes. A licence removes all of that.
11. Preferences
On the Mac: GlideMix → Preferences…. On Windows: Settings → Preferences. Or press ⌘/Ctrl + ,. Cancel undoes everything you changed in the dialog.
| Page | What's on it |
|---|---|
| General | Update check, the folder for temporary files and unsaved projects, free disk space, FFmpeg. |
| Appearance | Light or dark theme, accent colour, high contrast, clip style, font and size. |
| Audio settings | Sound card, outputs, headphone cue outputs, sample rate, buffer size and latency, meter range. |
| Playback/Recording | Playback quality and dithering, input monitoring, recording lead-in. |
| Music library | Music folders, watch folders and automatic analysis, analysis mode, accurate beat analysis (slower), rescan at start-up, writing tags to files, switches for the other DJ apps, table look (row height, font), key notation and the Key column's look, search settings, and what happens to audio files that aren't in your library. |
| Transitions | Where Mix Now lands (bar or phrase) and which transition it uses; whether the transition pill opens the transition window or the DJ mixer; build, duplicate and delete your own transitions. |
| Effects | Which effects and plug-ins are shown, how the effect menu is organised, DJ EQ crossover frequencies, extra VST3 folders. |
| Stems | Install the stems engine, GPU or CPU, quality, cache size and Clear cache. |
| Live broadcasting | Server, what listeners see, source and MP3 bitrate. |
| Waveforms | Track view, Classic or DJ-style colour waveforms, lane background, beat lines, the phrase ribbon on or off, and mouse wheel zooms the timeline (hold ⌘/Ctrl to scroll instead). |
| Spectral display | Colours and scale of the spectrogram view. |
| Audio editing | What happens when you delete or paste part of a clip, and other editing behaviour. |
| Shortcuts | Change any keyboard shortcut. |
12. Licence and updates
The download is the free demo with every feature. It has three limits: every 2 minutes a voice says "Glide Mix demo" over the music, exports are MP3 at 96 kbps, and an export stops after 20 minutes. A licence (€49 during the Beta, normally €89, one-time) removes them for good.
How to activate your licence
- Buy it from Help → Licence… or the Download page.
- In the order email, open Access purchase and copy the key. It starts with
GLIDEMIXPRO-. - In GlideMix, open Help → Licence…, paste the key and click Activate. You need to be online this once; after that GlideMix works offline.
How to move it to another computer
One licence works on three computers, Mac and Windows mixed. To free one: Help → Licence… → Deactivate this computer, or use the customer portal (the Access purchase link in the order email).
How to update
- GlideMix checks once a day (switch it off in Preferences → General) and the status line tells you when a new version is out. Help → Check for update checks now.
- On the Mac: Install Update, then Install and Relaunch. On Windows the new installer runs and GlideMix reopens. All 1.x updates are free.
- GlideMix tells you what changed the first time it starts after an update. Help → What's new shows it again. The full history is on GitHub.
13. Keyboard shortcuts
Help → Keyboard shortcuts shows every shortcut, searchable. Edit shortcuts… or Preferences → Shortcuts lets you change them. A few to start with:
| Key | Action |
|---|---|
| Space | Play / stop (in the beat grid editor: play its song) |
| ↑ ↓ | Move through the song list |
| ⌘/Ctrl + Z | Undo (everything, including beat grid changes) |
| ⌘/Ctrl + S | Save the project |
| ⌘/Ctrl + N | New project |
| ⌘/Ctrl + Shift + E | Export audio |
| ⌘/Ctrl + F | Fit the whole mix on screen |
| L | Loop on / off (draw a loop by dragging in the strip under the ruler's numbers) |
| Shift + L | Loop the selection |
| ⌘/Ctrl + D | Repeat the selection right after itself |
| ⌘/Ctrl + I | Split at the selection |
| ⌥/Alt + I / O | Set the selected song's IN / OUT anchor at the playhead |
| A | Show automation lines |
| Shift + U / S | Mute / solo the track |
14. Problems and logs
- Crackles: raise the buffer size in Preferences → Audio settings.
- A song is off the beat: fix its grid. If the beat moves part-way through, use Split at grid jumps.
- The BPM is double or half: right-click the song in the library → Adjust BPM.
- A song shows "—" for key or BPM: it hasn't been analysed yet: select it and click Analyze.
- Songs are missing: look in Missing Tracks, and use Relink in Preferences → Music library if a music folder moved.
- Separate stems is grey: install the engine in Preferences → Stems.
- A plug-in was turned off: see here.
- The lanes look wrong: click Reset view in front of the zoom sliders.
How to report a bug
- Write what you did, what you expected and what happened, with a screenshot if you can.
- Attach the newest log file:
- Mac:
~/Library/Application Support/Glidemix/Glidemix/logs(Finder: Go → Go to Folder…) - Windows:
%LOCALAPPDATA%\Glidemix\Glidemix\logs(paste it into the Explorer address bar)
- Mac:
- Send it to
#bug-reportson Discord or to [email protected].